
JS Exercise 5: Events
(Week 9, Tuesday 10/23)
In the previous exercises, our code all executed as soon as the page loaded. In this exercise we'll look at how DOM events can be used to trigger the execution of code. Some typical events that are used to trigger a script include "the page has finished loading", "a link or button was clicked", "the file started to download", "the select value changed. You can see a complete list of DOM events here on MDN's Event Reference page, and on their "Introduction to Events" tutorial.
Start by downloading and uncompressing the event-examples.zip folder. We will be referring to pages in that folder throughout this exercise.
Event Handlers
Browser "on-event" handlers are one of the most common ways to invoke a script based on basic browser events like onload, onclick, onmousedown, onkeyup and so on. Open the events1.html file in an editor and look at the code. Then load it in a browser, and click on the paragraph; the text should change.
We start by selecting an element on the page, and then assigning a function expression as the onclick event handler for the selected element (the first paragraph).
In the function, we used the this keyword. In JavaScript the value of this varies depending how it it used. In a function that is triggered by an event, this is a reference to the object that called the method - in this case the paragraph.
The commented-out third section uses a slightly different approach. Rather than using the this keyword, it uses the e parameter, which is the default Event object that is sent along by the event handler. The event object has a number of properties and methods, and in this case e.target is the object that recieved the event (once again, the paragraph).
If you add a breakpoint into the debugger (Use the Sources tab in Chrome, or the Debugger tab in Firefox, and click in the gutter to set breakpoint), and then click the paragraph, you can inspect the properies of this Event object and see that it's actually a MouseEvent object.
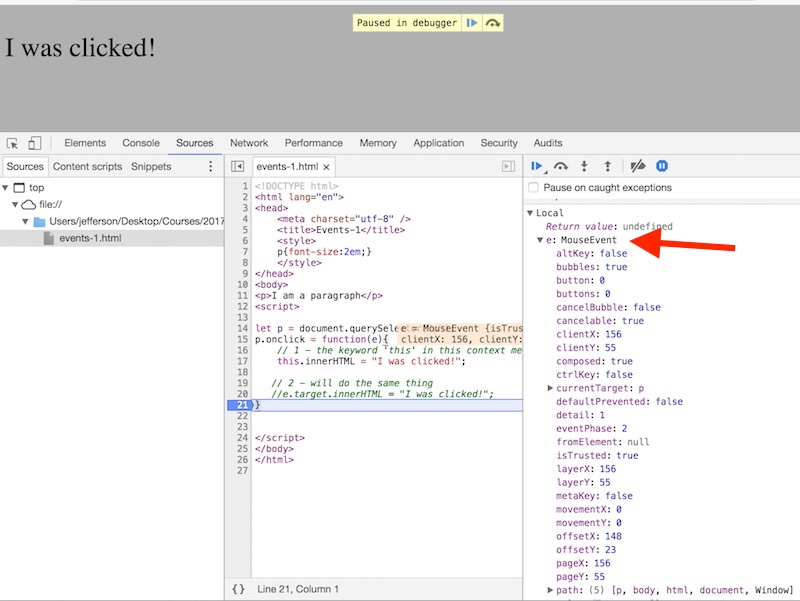
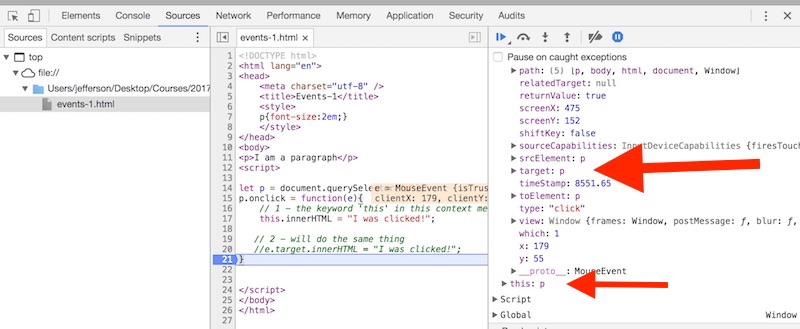
Scroll down in the list of properties and values, and you'll see that the value of e.target and the value of this are both the paragraph that was clicked on.
Event Handlers and Function References
Open the events2.html file and look at the code. In this example, the code points to a declared (and named) function. The function will be triggered when you click on the paragraph. Try it out in a browser. Clicking the paragraph will cause its text to change as it did in the previous section; clicking the div will trigger the divClicked() function.
(Intentionally) Breaking Your Code
One common mistake that is easy to make is to write this line:
document.querySelector("div").onclick = divClicked;
as this:
document.querySelector("div").onclick = divClicked();
Go ahead and make that change to events2.html and run this code. Note that the div.onclick code doesn't work now - what happened?
In the debugger, add a breakpoint and reload the page. Then find the value of p.onclick (recall we didn't change that code) - you can see below that the value of p.onclick is a function.
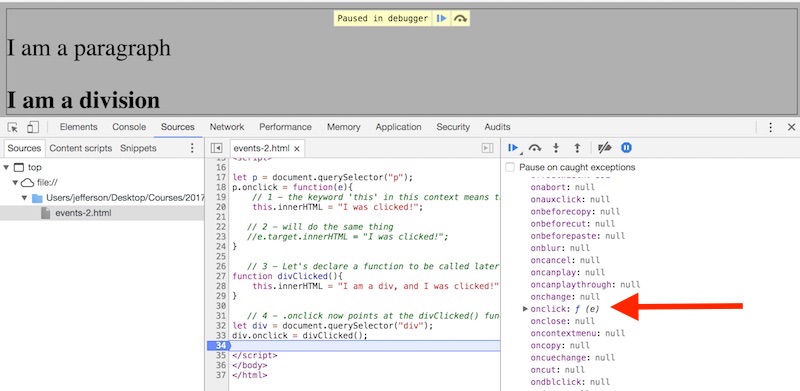
Now look at the value of div.onclick - you will see that it is null, which is why the onclick code no longer works.
What happened is that when we added the () to the end of onclick = divClicked(), the function was called immediately, and the return value of the function (undefined) was stored in the onclick property instead of the function reference it was expecting.
Change the code back so that it works again.
Events and Arrow Functions
Arrow functions are an ES6 addition. They have two advantages: they have a shorter syntax than regular functions, and they do not bind their own this keyword.
Open the arrows.html file and look at the code.
Four of the five function definitions in that example do the same thing, but the syntax is increasingly concise. Arrow functions are particularly helpful with arrays, because you can easily pass the arrays as arguments to functions such as .sort() or .filter() or .forEach() -- all of which we'll be working with.
MDN Arrow function documentation
.Note: not everyone thinks that the more concise syntax of arrrow functions is advantageous, since they are sometimes less readable than functions written with the tradtional function syntax. Our advice: use arrow functions wherever you don't need or want this binding, and where they make your code more clear.
We can use arrow functions as event handlers too. When an event handler points at a regular function, the value of this is the object that received the event. However, when an event handler points at an arrow function, the value of this will instead be "the value of the enclosing execution context.
Open the events3.html file and look at the code, and then open in in a browser. Clicking on the div changes both the div and the paragraph!
Here's what's happening:
- creates a function that will change the paragraph
- declares an arrow function that will change the div
- connected the div onclick event to the arrow function
When the div is clicked, the code in #2 runs. In that context, e.target refers to the element that was clicked on, the div. But in an arrow function (unlike a regular function), this now refers to the window object, which includes the changeParagraph() function we called earlier.
(Actually, in the above example, the this in this.changeParagraph() was optional, but we wanted to illustrate how the value of this has changed in an arrow function.)
Event Listeners
The major limitation of the event handlers shown above is that each element can have only one event handling function attached to it at a time (click, hover, etc). The addEventListener() method has no such restriction.
Open the events4.html in a browser and click on the paragraph and the div to see what happens. Then open it in your editor. You should see that the paragraph has three functions attached to it. These three functions will change the contents of the HTML, set its color to magenta, and change the font-style to italic.
The div has two functions attached to it. These functions will change also change the contents of the element and set its color to magenta, but the font-style should not change.
It is very important to note that the event being passed into addEventListener() is 'click', and NOT the event handler 'onclick'.
Removing Event Listeners
If neceessary, you can call removeEventListener() later in your script to remove event listener functions.
In events4.html, add the following code:
Try out this new code. If you click on the paragraph first, and then the div, you will see that the div has lost 2 of its event functions, but gained the changeStyle function.
Adding Properties to Elements With element.dataset
What if we want to toggle the appearance of the paragraph and div when we click on them. Or if we want to use the same code for the paragraph and div, as well as any number of other elements? There are a number of ways to do this, but in this example we'll use the HTML5 "Custom Data" attribute to add properties to the HTML elements we click on. (You can read more about them on this page.)
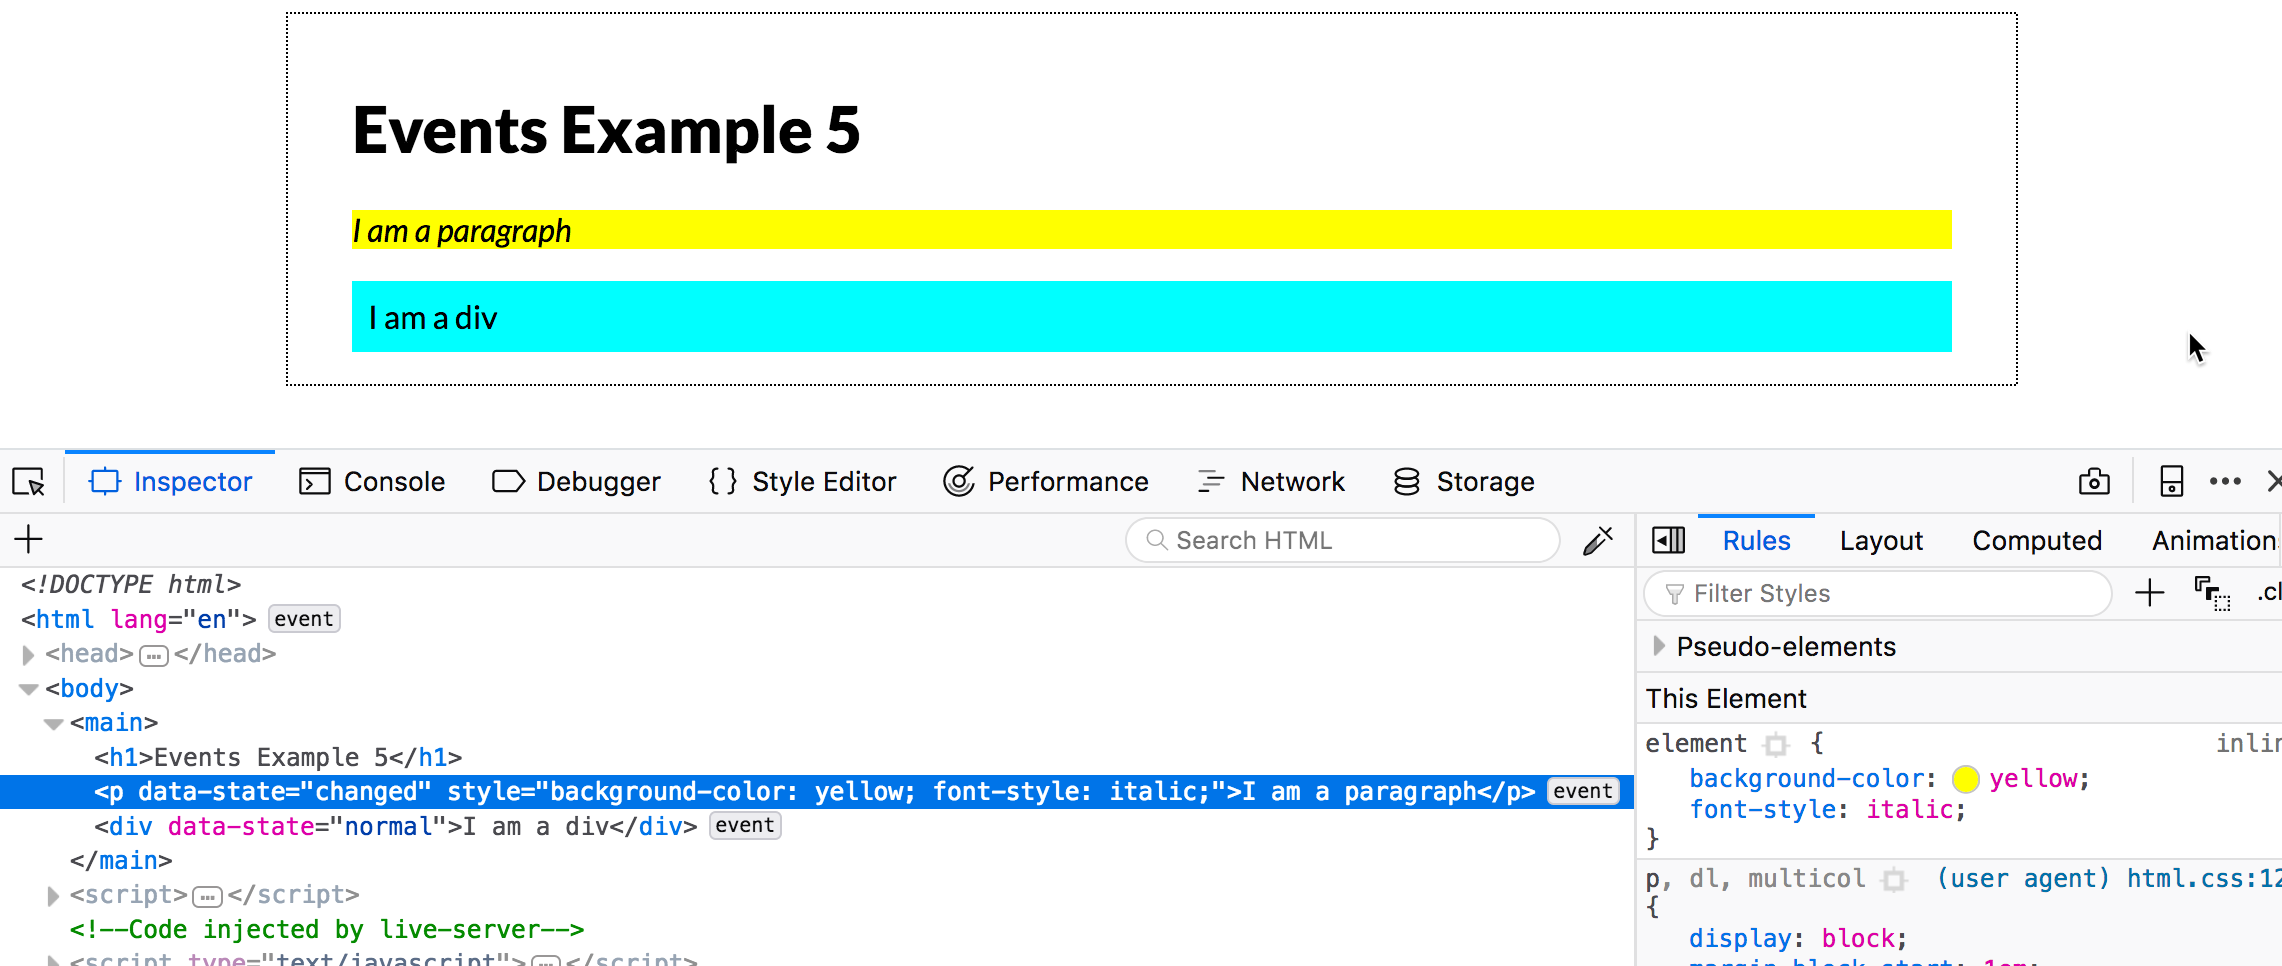
Open the file events5.html in a browser, and try clicking on the elements multiple times. Each click should toggle the element's styles between two states. Open the inspector tab so that you can see what happens to the element in the DOM when you do this.
Open the file in an editor and look at the code.
This toggling between the 2 appearances is being tracked by changing dataset.state from "normal" to "changed". By adding a state property to any element we click on, our code allows that element to "remember" that it has been changed or not. Note that we came up with the name .state on our own. We could have called it anything we wanted--like .mystate or .toggle.
Look at 2A, 2B, and 3C in the events5.html script. Lines 2A & 2B are really unnecessary because line 3C will evaluate to undefined if we never define an initial value for dataset.state on each element. And because undefined is a "falsy" value and will evaluate to false, the code will run fine even with 2A and 2B. So why did we include A and B? It's really just to make the code easier to understand by humans--and also so that we could remind you about default values!
Deliverable
Open the events-exercise.html file. It has a form in it, with a Submit button that current does nothing.
Using what you learned in this exercise, modify this page to do the following:
- When you click on a radio button, text reading "You have selected the color value" (where value is the value of the button you chose) should appear in the #info paragraph.
- When you click the submit button, the text in the paragraph should change to "Your FINAL CHOICE is value," and the <legend< element should be displayed in the color you chose.
Here are a few hints to help you with your code:
- You'll need to use
document.querySelectorAll()to create an array of all the radio buttons. (There are several different selectors you could use for this.) Then you'll need to use aforor afor...ofloop to assign either an event handler or an event listener with appropriate behaviors. - To get the value of a radio button, the function it triggers can reference
this.value. - Both the radio buttons and the submit button can use
clickas a trigger. - You'll need to keep track of the color chosen, so think carefully about the scope of your variables and where they need to be defined.
When you're done, link the file to your landing page with the name JS Event Exercise, and upload it no later than noon on Saturday.